Strawberry & Cream Scones

Okay y’all, let it be known that I absolutely love scones!! I’m so excited to share this post because these little treats are freaking delicious and they don’t really take a lot of effort!

So today my sister in law and my baby nephew were going to come spend the afternoon with GM and I. I told her I was going to bake something for her and asked her if she was a fan of scones! She said she had never had them before. I figured I’d make them anyway and just hope she would like them!!

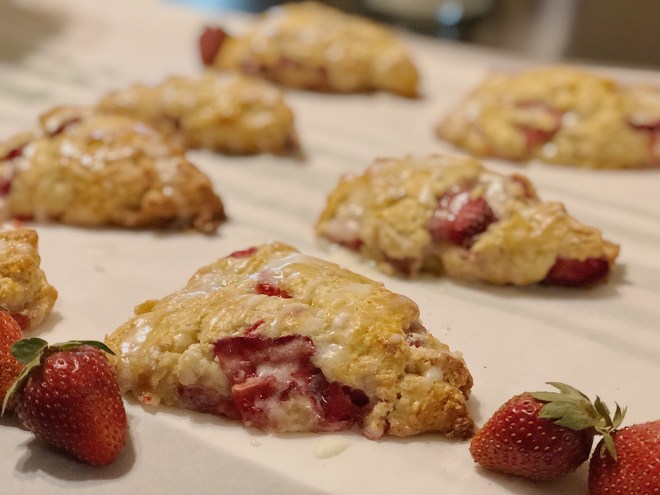
I’m a big coffee drinker, so eating scones with a cup of coffee makes for the PERFECT breakfast, for me anyway!! They are typically not too sweet, but my SIL is not a coffee drinker, so I decided these would have to be a tad sweeter than normal because she wasn’t going to be enjoying them with a cup of coffee! So I added a sugary glaze over the top of these that did just the trick! OMG y’all, I’m obsessed with this recipe. I want it printed out on my fridge and I want someone to make these for me, fresh every morning.

I still had some leftover strawberries my grandfather had planted and for this recipe, I only used about a cup of fresh berries, which was perfect! When you take a bite of the crumbly bread, you get pops of fresh strawberry and the sweet glazed icing really just tied it all in together for me! Between my SIL, husband, granny and myself, these little babies were knocked out pretty quick. Seriously they are so good!

No lie, it probably took me 10 minutes to prep these! They were in the oven for about 20 minutes or so, so overall almost 30 minutes of time spent. Not bad, not bad! I want to make blueberry ones next, maybe with a lemon sugar glaze? Let me know if that sounds like a good idea.

Don’t be intimidated by making these! I would say its totally level “easy” in the baking department. Any non baker can pull these together!

I hope you enjoy 🙂


Ingredients:

For the bread

- 2 1/2 cups of flour
- 1/2 cup of sugar
- 2 tsp baking powder
- 1/2 tsp baking soda 
- 1 tsp salt
- 1 stick unsalted butter (very cold)
- 1 egg
- 1/2 cup whole milk
- 2 tbs heavy whipping cream
- 1 cup strawberries

For the egg wash

- 1 egg beaten 
- 1 tsp heavy cream

For the glaze

- 1 cup powdered sugar
- 1/4 cup heavy cream
- splash of vanilla
- pinch of salt

Instructions:

Bring your oven to 400 degrees. In the time it takes you to do the next steps, take your stick of butter and put it in the freezer to get it really cold. Cover a large baking sheet with parchment paper then set aside. In a large bowl, combine all the dry ingredients. In a medium bowl, combine all the wet ingredients. Now it’s time to take the butter out of the freezer and cube into small pieces. Once the butter has been cut, place it into the bowl of dry ingredients and use your fingers to combine it. It will be very crumbly/floury and look like a mess. If it’s messy, don’t panic, you’re doing it right.

Take your bowl of wet ingredients and add into the bowl of dry ingredients/butter. Use fingers to combine the dough together, it should still be lumpy. Take your cut up strawberries and fold into the doughy mixture!

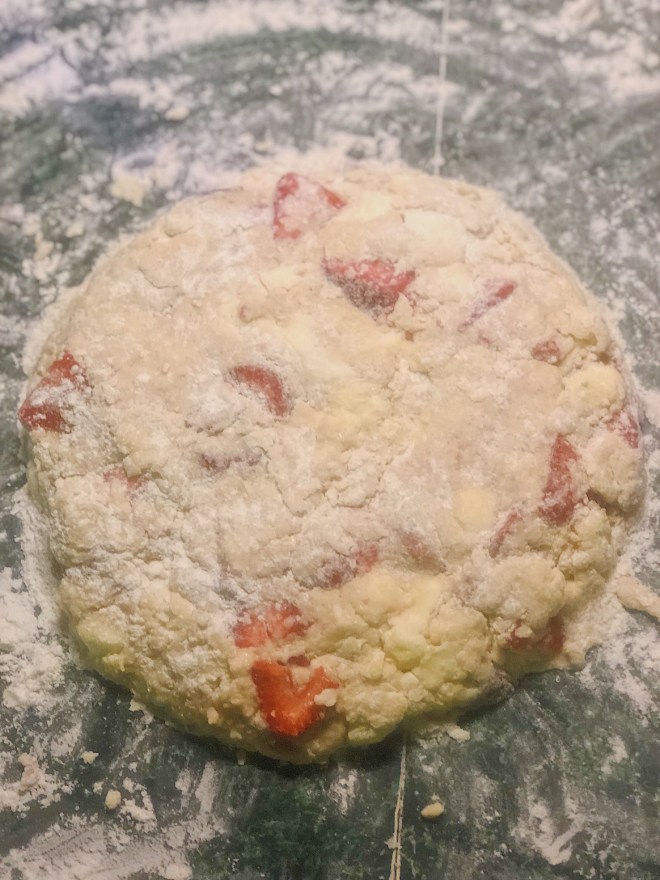
On a clean work surface, cover with a large amount of flour, so you can knead your dough without it sticking. Before kneading, this is what your dough mixture will look like. Reference photo below.

7416026E-8196-4EB9-81F0-D42D7855780E.JPG

Now, you will use both of your hands to form the dough into the work surface to incorporate the ingredients and to shape the dough into a circle with about an 8-9 inch diameter. See photo below for reference.

B8E284AC-38DD-4D26-B319-00BA2A7BD500

I continuously added flour as I was shaping my dough, because it was getting a little sticky. If that happens, just toss a little flour over the sticky spots and it will help you form the shape. Once your dough is in a circle, slice in 8 even pieces and place on the baking sheet about 2 inches apart. Take your egg and cream, beat together in a small bowl, and coat a small amount over each pastry. (I used a cooking brush my husband uses to coat BBQ sauce on his food with.) Place in the oven for about 20 minutes or until a beautiful golden brown color is on top of the scones.

While the scones cool, in a medium bowl combine the cream, powdered sugar, salt and  vanilla. If the mixture is too runny, add a bit more of sugar, if it is too thick, you can thin it down with more cream. Lightly drizzle the pastries with the glaze. Let stand for a few minutes and they are ready to serve! Thank you for reading!

Advertisement

Coffee Cake with Crumble Topping


Thank you for reading! Welcome to my first blog post. First off, I’m not much of a writer, so I will make this short- or try to. If you’re even interested in this post, you’re probably looking for the recipe and not what I have to say about it, lol. And that’s pretty much the purpose of this blog, I just want an outlet to share my recipes with family and friends!

Typical coffee cake doesn’t have actual coffee in it, it could I guess, but it get’s to be called ‘coffee cake’ because you’re suppose to drink coffee while you eat it! When I first made it, I might have accidentally devoured two healthy portions. It’s a really moist cake because of the sour cream added into the batter. My favorite part is probably the crumble though. It adds nice texture and is not too sweet.

Coffee cake is good for breakfast on the go too. You could easily bag it and munch on it during your commute to work. Or for other stay at home mamas like me, it’s perfect for a make ahead breakfast for the week. I just made this cake yesterday so I will probably give pieces of it to my mom and Luke’s mom to take.

If you attempt making this cake, please read my notes on the recipe.

COFFE CAKE

9B0CCAAF-9FC1-4E49-A07B-BF64219DB8ED


For the Cake
- 1 Stick of unsalted butter
- 1 Cup Sugar
- 2 Large Eggs
- 2 Cups Flour 
- 1 Teaspoon Baking Soda
- 1 Teaspoon Baking Powder
- 1 Teaspoon Salt (omit this step if you use salted butter)
- 2 Teaspoons Mexican Vanilla 
- 1 1/2 Cup Sour Cream
For the Filling
- 1 Cup Brown Sugar 
- 1 1/2 Teaspoon Cinnamon
For the Topping
- 1 Cup Flour
- 1 Cup Sugar 
- 1 Cup Brown Sugar
- 2 Teaspoons Cinnamon 
- 1 Teaspoon Salt 
- 1 Stick of Unsalted Butter- Melted
Instructions

Preheat your oven to 350 degrees.

I started my crumble topping before working on my batter. To start, just combine flour, sugar, cinnamon and salt in a medium bowl. Melt your stick of butter and combine the melted butter to the dry ingredients. You can mix around with a fork, or your hands. Once everything is combined and kind of crumbly, stick the topping in the refrigerator and don’t bring out, until your cake is ready to stick in the oven.

Now to start on the cake batter. In a mixing bowl, cream together the butter and sugar, until well combined. Next beat in the two large eggs. A cup at a time, mix in the flour. Once well combined, mix in at once the baking soda, baking powder and salt. Again, you can omit the salt if you are using salted butter. Combine all ingredients with mixer and then add your vanilla and sour cream. Set aside your cake batter and start onto the filling.

This part can be omitted if you’re tired at this point. It’s just an extra added part of sugary cinnamon, a lot of coffee cakes don’t add this at all. But it’s also pretty to look at once you start slicing your cake. Simply combine the cinnamon and sugar in a small to medium bowl, then set aside.

Now it’s time to add your cake into the pan. I used a 7×11 pyrex, because I like my cakes to be thick, a 9×13 I believe is more traditional. I am strict on believing that coffee cakes should not be done in round pans lol. It has to be sliced and served in a square. Looking at my photo it kind of looks like it’s a triangle, but it’s not I promise. Grease your pan and pour half of the batter mixture in. Use a spatula to push the batter against the baking dish. Next spread your cinnamon filling over the batter, again use a knife or spatula to evenly cover. Then you pour the remaining cake batter over the filling. Once poured and evenly covered, it is time to bring out the crumble topping from the fridge. Sprinkle the crumble evenly over the entire dish.

Take your cake and stick into the oven for 50-60 minutes. Kind of a long cooking time, I think because of the sized dish I used.

Notes!!

You do not have to use Mexican vanilla for the cake batter. If you continue to follow my recipes, you will see that I use Mexican vanilla in just about every baking dish I create. However, regular vanilla is fine! My husband got me a large container of Mexican vanilla the last time he went to the valley for work, and i Loveeeee using it!

The 7×11 Pyrex is not a traditional size, a 9 x 13 is a lot more common and it will reduce your baking time by a lot I imagine. Whatever size baking dish you use, I would set your timer to 30 minutes. At some point between 30-40 minutes, my cake was perfectly brown, but it was NOT cooked on the inside all the way, so I covered the dish with foil to prevent it from browning more. This allowed the dish to not burn and to continue cooking on the inside! My entire baking time was 55 minutes with this dish. Again, set your timer to 30 minutes and keep an eye on how it’s looking. Insert a toothpick inside to see if it comes out clear or still wet. A clear toothpick will indicate the cake is done. I stab it a few times around the center to make sure it’s done.

Thanks for reading! 🙂